- 7.1Kshares
- Facebook7.0K
- Twitter9
- Pinterest16
- Reddit0
- 0
- views
- Like
- Digg
- Del
- Tumblr
- VKontakte
- Buffer
- Love This
- Odnoklassniki
- Meneame
- Blogger
- Amazon
- Yahoo Mail
- Gmail
- AOL
- Newsvine
- HackerNews
- Evernote
- MySpace
- Mail.ru
- Viadeo
- Line
- Comments
- Yummly
- SMS
- Viber
- Telegram
- Subscribe
- Skype
- Facebook Messenger
- Kakao
- LiveJournal
- Yammer
- Edgar
- Fintel
- Mix
- Instapaper
- Copy Link
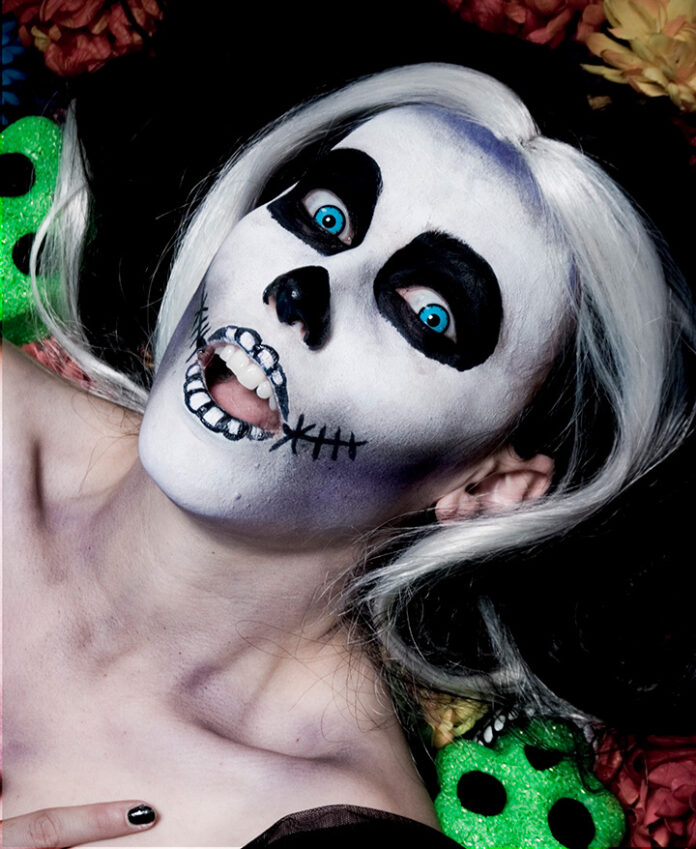
Although the common skull makeup was most likely popularized by the band, the Misfits, painting such a death mask on the living has existed for centuries, especially within the rich Mexican culture that frequently incorporates the use of skulls and skeletons throughout their Day of the Dead celebrations. It’s actually my immersion in the Mexican cultures that lead me to meet La Santisima Muerte, my inspiration for this particular skull makeup. Various sources cite her as being a sort of female incarnation of Death while others have her as a vengeful being that had offerings made to her to keep loved ones faithful.
But I’m not here to give you a history lesson; I’m here to tell you a little bit about makeup. Namely, just how should you go about painting yourself like this and not end up looking like the wrestler, Sting. Not sure who that is, huh? Moving right along then!
What You’ll Need:
White cream foundation or “greasepaint”
Black moist cake make up or creme
Black eye shadow
Purple eye shadow
Translucent or white setting powder
Cosmetic sponge
Small rounded tip brush (optional)
Eye shadow brush
One of the first things you need to understand is how weather is going to affect your makeup and I don’t mean in the obvious way that rain can take you from Goth diva to bad Crow impersonator in a few moments. When you’re altering your skin color drastically such as this, it’s a very heavy base that can take several layers, especially if you’re in a lot of heat. Going to a club with makeup like this will be affected not just by drunken club goers who insist on touching your face asking you stupid questions, but by all the body heat everyone is putting off in an enclosed area.
Take a standard white grease base such as Ben Nye or Mehron, although those cheap greasepaints you pick up for pennies around Halloween will work, the quality of the stage standards cannot be beat. It’s always best to apply in light layers with a sponge instead of trying to achieve dinner plate white in one fatal swoop by plopping the entire contents on your face at once.
After you’re satisfied with the white face, set the makeup with a dusting of face powder. I cannot stress how important this it, although it’s not an impenetrable force field, it will protect the majority of the white makeup. I’ve hugged people after shoots, forgetting all the makeup I’ve had on, and have had little to no make-up transfer onto them. I use Ben Nye’s neutral set powder, but have also used simple baby powder in a pinch.
If you want as much black on your eyes as possible, this is the time to use black eyeliner on the inner rims. This is also the ideal moment to put in any special effects contact lenses you might want. Using a small eye shadow brush or one you feel comfortable using for smaller areas, dab on a thin layer of black moist cake makeup such as Mehron’s Paradise line which offers a palette of 8 colors, all water activated. Black eye shadow can work, but it won’t be as dark. A creme base or water activated black is best. Then fill in your entire eye socket with the black.
If this is a look you’re thinking about going to the club with, I’d go with black lipstick and liner for the lips. The teeth look can take some time plus is hard to maintain throughout a night of drinking. The only reason mine will stay longer is because I use airbrush make-up, which I highly caution you experiment with first and follow the manufacturer’s instructions. You can achieve the same teeth look by first using a round tip brush (make a good tooth shape) and the creme white and just touching the brush to your lips in the shape of the teeth, then using either a very thin brush and black creme makeup or even an eyeliner (I’ve even used liquid liner before) you draw in the outline for the teeth.
Finish up the face by lightly applying black and purple eye shadow around the edges of the white face and back into your hairline. I also use the same eye shadows as blush, except I’ll shade below the cheek line toward the chin to increase the skeletal face. If you feel like extending your makeup a bit more, and your neck and shoulders will be exposed, lightly begin to dust on purple eye shadow into your collarbone and up your neck, just pay attention to your bone structure as you’re seeking to emphasize it. Always apply lightly in layers; you can always darken as needed. The purple works well for shadow and can be used more freely on the bone and around the bone, then the black should be used directly on the bone to give it a more strong appearance. Now the rest is up to you!


